Last Updated on December 3, 2018 by Admin
6.1.2.12 Lab – Manage Virtual Memory in Windows 7 and Vista Answers
Learning with Cisco Netacad, there are many exams and lab activities to do. Some instructor require students to complete all Chapter exams, Pre-Test, Practices Final, Final Exam and Chapter Quiz. No mater what instructors want you to do, examict.com offers all exams and lab activities answers and solutions with clear explanation. Our Experts have verified all exam answers before we published to the website. We recommended you to chose any relevant chapter from the following:
Lab – Manage Virtual Memory in Windows 7 and Vista (Answers Version)
Introduction
In this lab, you will customize virtual memory settings.
Recommended Equipment
- A computer with Windows 7 or Vista installed
- The hard drive must have two or more partitions
Note: At least 2GB of free space is recommended on the second partition.
Answers Note: Set virtual memory for the two partitions used in the lab to be managed by the system. Start > right-click Computer, and click Properties > Advanced system settings > Performance Settings > Advanced tab > Change. Place a check mark in the Automatically manage paging file size for all drives box.
Step 1: Open System Properties
- Click Start > right-click Computer > Properties > Advanced system settings.

6.1.2.12 Lab – Manage Virtual Memory in Windows 7 and Vista Answers 01
- The System Properties window opens. Select the Advanced tab and click Settings in the Performance area.

6.1.2.12 Lab – Manage Virtual Memory in Windows 7 and Vista Answers 02
- The Performance Options window opens. Click the Advanced tab.

6.1.2.12 Lab – Manage Virtual Memory in Windows 7 and Vista Answers 03
What is the current size of the virtual memory (paging file)?____________________________________________________________________________________
Answers may vary. The example shows 2047 MB
Step 2: Make virtual memory changes.
- Click Change in the Virtual memory area to open the Virtual Memory window.

6.1.2.12 Lab – Manage Virtual Memory in Windows 7 and Vista Answers 04
- Remove the check mark from Automatically manage paging file size for all drives.

6.1.2.12 Lab – Manage Virtual Memory in Windows 7 and Vista Answers 05
What Drive [Volume Label] contains the paging file?____________________________________________________________________________________
Answers may vary. In the example, the answer is C [Local Disk]: - Choose the I: drive. Select the Custom size: radio button.

6.1.2.12 Lab – Manage Virtual Memory in Windows 7 and Vista Answers 06
Note: Your drive letter and volume may be different than the example. Replace I: with the drive letter for your second partition on your PC.
What is the recommended paging file size for all drives?____________________________________________________________________________________
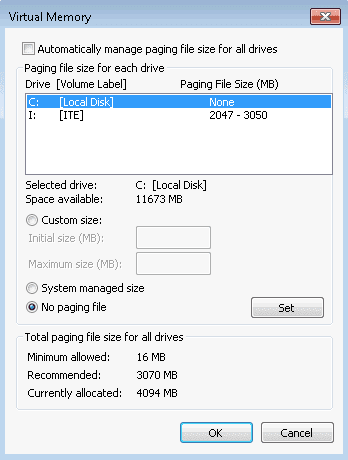
Answers will vary. In the example, the answer is 3070MB. - Enter a number smaller than the recommended file size in the Initial size (MB): field. Enter a number that is larger than the Initial size but smaller than the recommended file size in the Maximum size (MB): field. Click Set.

6.1.2.12 Lab – Manage Virtual Memory in Windows 7 and Vista Answers 07
- Select the C: drive. Select the No paging file radio button, and click Set.

6.1.2.12 Lab – Manage Virtual Memory in Windows 7 and Vista Answers 08
- The System Properties warning message displays. Click Yes.

6.1.2.12 Lab – Manage Virtual Memory in Windows 7 and Vista Answers 09
- Click OK on the Virtual Memory window to accept the new virtual memory settings.
- Click OK on the Performance Options window to close it.
- Click OK on the System Properties window to close it.
Step 3: Navigate back to the Virtual Memory window to verify changes.
- The System Properties window opens. Select the Advanced tab and click Settings in the Performance area.
- The Performance Options window opens. Select the Advanced tab, and click Change.
- The Virtual Memory window opens displaying the new paging file information. Verify that your changes have been made.
 What Drive [Volume Label] contains the paging file?____________________________________________________________________________________
Answers may vary. In the example the answer is I [ITE]
Step 4: Reset the virtual memory back to the original settings.
- Select drive C: [Local Disk] > System managed size > Set.

- Select I: > No paging file > Set.

- Check Automatically manage paging file size for all drives, and click OK.
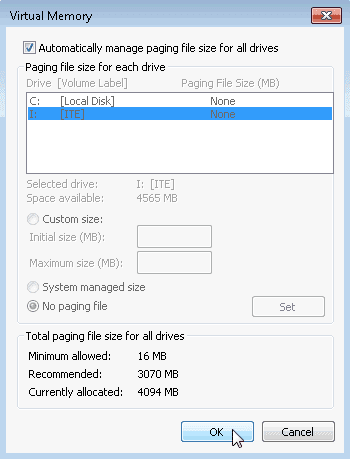
- The System Properties window opens informing you that a restart is required before changes will take effect. Click OK.

- Click OK to close the Performance Options window. Click OK to close the System Properties window.
- The warning message displays: You must restart your computer to apply these changes. Click Restart Now.

Reflection
Why would you ever change the default virtual memory page file settings in Windows?
_______________________________________________________________________________________
_______________________________________________________________________________________
_______________________________________________________________________________________
_______________________________________________________________________________________
_______________________________________________________________________________________
_______________________________________________________________________________________
Answers will vary. With a default installation, Windows creates the virtual memory page file in the root folder on the same drive which the systems files are stored. Over time, this drive may run out of free space, which would cause system problems. You could free up space on that drive by moving the virtual memory page file to a different drive. Another reason you may want to move the virtual memory page file is that possibly you have added a faster drive, an SSD for example, and you want to move your virtual memory page file to that drive in an attempt to speed up Windows response times.
Learning with Cisco Netacad, there are many exams and lab activities to do. Some instructor require students to complete all Chapter exams, Pre-Test, Practices Final, Final Exam and Chapter Quiz. No mater what instructors want you to do, examict.com offers all exams and lab activities answers and solutions with clear explanation. Our Experts have verified all exam answers before we published to the website. We recommended you to chose any relevant chapter from the following: