Last Updated on November 17, 2020 by Admin
27.2.10 Lab – Extract an Executable from a PCAP Answers
Lab – Extract an Executable from a PCAP (Answers Version)
Answers Note: Red font color or gray highlights indicate text that appears in the instructor copy only.
Objectives
Part 1: Analyze Pre-Captured Logs and Traffic Captures
Part 2: Extract Downloaded Files from PCAP
Background / Scenario
Looking at logs is very important, but it is also important to understand how network transactions happen at the packet level.
In this lab, you will analyze the traffic in a previously captured pcap file and extract an executable from the file.
Required Resources
- CyberOps Workstation virtual machine
Instructions
Part 1: Analyze Pre-Captured Logs and Traffic Captures
In Part 2, you will work with the nimda.download.pcap file. Captured in a previous lab, nimda.download.pcap contains the packets related to the download of the Nimda malware. Your version of the file, if you created it in the previous lab and did not reimport your CyberOps Workstation VM, is stored in the /home/analyst directory. However, a copy of that file is also stored in the CyberOps Workstation VM, under the /home/analyst/lab.support.files/pcaps directory so that you can complete this lab. For consistency of output, the lab will use the stored version in the pcaps directory.
While tcpdump can be used to analyze captured files, Wireshark’s graphical interface makes the task much easier. It is also important to note that tcpdump and Wireshark share the same file format for packet captures; therefore, PCAP files created by one tool can be opened by the other.
- Change directory to the lab.support.files/pcaps folder, and get a listing of files using the ls –l command.
[analyst@secOps ~]$ cd lab.support.files/pcaps
[analyst@secOps pcaps]$ ls -l
total 7460
–rw-r–r– 1 analyst analyst 3510551 Aug 7 15:25 lab_prep.pcap
–rw-r–r– 1 analyst analyst 371462 Jun 22 10:47 nimda.download.pcap
–rw-r–r– 1 analyst analyst 3750153 May 25 11:10 wannacry_download_pcap.pcap
[analyst@secOps pcaps]$
- Issue the command below to open the nimda.download.pcap file in Wireshark.
[analyst@secOps pcaps]$ wireshark nimda.download.pcap &
- The nimda.download.pcap file contains the packet capture related to the malware download performed in a previous lab. The pcap contains all the packets sent and received while tcpdump was running. Select the fourth packet in the capture and expand the Hypertext Transfer Protocol to display as shown below.

- Packets one through three are the TCP handshake. The fourth packet shows the request for the malware file. Confirming what was already known, the request was done over HTTP, sent as a GET request.
- Because HTTP runs over TCP, it is possible to use Wireshark’s Follow TCP Stream feature to rebuild the TCP transaction. Select the first TCP packet in the capture, a SYN packet. Right-click it and choose Follow > TCP Stream.
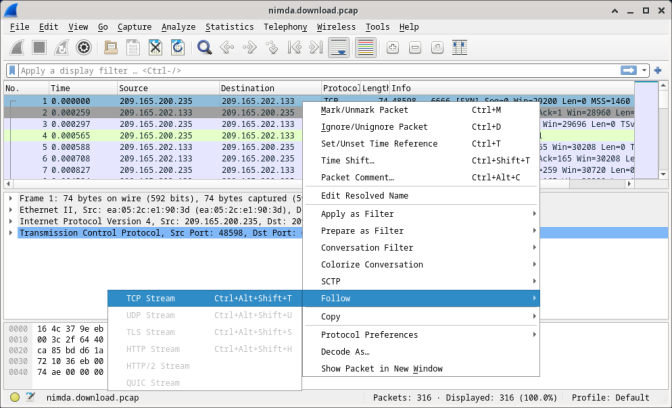
- Wireshark displays another window containing the details for the entire selected TCP flow.

Questions:
What are all those symbols shown in the Follow TCP Stream window? Are they connection noise? Data? Explain.
Type your answers here.
The symbols are the actual contents of the downloaded file. Because it is binary file, Wireshark does not know how to represent it. The displayed symbols are Wireshark’s best guess at making sense of the binary data while decoding it as text.
There are a few readable words spread among the symbols. Why are they there?
Type your answers here.
Those are strings contained in the executable code. Usually, these words are part of messages provided by the program to the user while it runs. While more of an art than a science, a skilled analyst can extract valuable information by reading through these fragments.
Challenge Question: Despite the W32.Nimda.Amm.exe name, this executable is not the famous worm. For security reasons, this is another executable file that was renamed as W32.Nimda.Amm.exe. Using the word fragments displayed by Wireshark’s Follow TCP Stream window, can you tell what executable this really is?
Type your answers here.
Scrolling all the way down on that window reveals that this is the Microsoft Windows cmd.exe file.
- Click Close in the Follow TCP Stream window to return to the Wireshark nimda.download.pcap file.
Part 2: Extract Downloaded Files from PCAP
Because capture files contain all packets related to traffic, a PCAP of a download can be used to retrieve a previously downloaded file. Follow the steps below to use Wireshark to retrieve the Nimda malware.
- In that fourth packet in the nimda.download.pcap file, notice that the HTTP GET request was generated from 209.165.200.235 to 209.165.202.133. The Info column also shows this is in fact the GET request for the file.
- With the GET request packet selected, navigate to File > Export Objects > HTTP, from Wireshark’s menu.
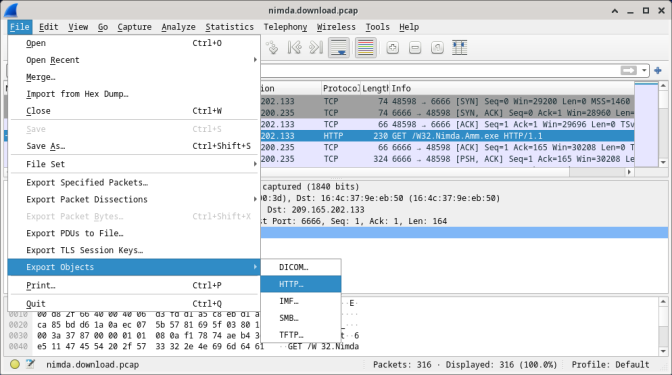
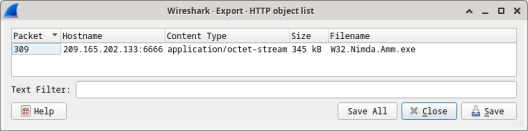
- Wireshark will display all HTTP objects present in the TCP flow that contains the GET request. In this case, only the W32.Nimda.Amm.exe file is present in the capture. It will take a few seconds before the file is displayed.
Question:
Why is W32.Nimda.Amm.exe the only file in the capture?
Type your answers here.
Because the capture was started right before the download and stopped right after. No other traffic was caught while the capture was active.
- In the HTTP object list window, select the W32.Nimda.Amm.exe file and click Save As at the bottom of the screen.
- Click the left arrow until you see the Home button. Click Home and then click the analyst folder (not the analyst tab). Save the file there.
- Return to your terminal window and ensure the file was saved. Change directory to the /home/analyst folder and list the files in the folder using the ls -l command.
[analyst@secOps pcaps]$ cd /home/analyst
[analyst@secOps ~]$ ls –l
total 364
drwxr–xr-x 2 analyst analyst 4096 Sep 26 2014 Desktop
drwx—— 3 analyst analyst 4096 May 25 11:16 Downloads
drwxr–xr-x 2 analyst analyst 4096 May 22 08:39 extra
drwxr–xr-x 8 analyst analyst 4096 Jun 22 11:38 lab.support.files
drwxr–xr-x 2 analyst analyst 4096 Mar 3 15:56 second_drive
–rw-r–r– 1 analyst analyst 345088 Jun 22 15:12 W32.Nimda.Amm.exe
[analyst@secOps ~]$
Question:
Was the file saved?
Type your answers here.
Yes
- The file command gives information on the file type. Use the file command to learn a little more about the malware, as show below:
[analyst@secOps ~]$ file W32.Nimda.Amm.exe
W32.Nimda.Amm.exe: PE32+ executable (console) x86-64, for MS Windows
[analyst@secOps ~]$
As seen above, W32.Nimda.Amm.exe is indeed a Windows executable file.
Question:
In the malware analysis process, what would be a probable next step for a security analyst?
Type your answers here.
The goal is to identify the type of malware and analyze its behavior. Therefore, the malware file should be moved to a controlled environment and execute it to watch its behavior. Malware analysis environments often rely on virtual machines and are sandboxed to avoid damage to non-test systems. Such environments usually contain tools that facilitate monitoring of the malware execution; resources usage, network connections and operating system changes are common monitored aspects.
There are also a few Internet-based malware analysis tools. VirusTotal (virustotal.com) is one example. Analysts upload malware to VirusTotal, which in turn, executes the malicious code. After execution and a number of other checks, VirusTotal returns a report to the analyst.